Indeed batteries have an essential part of our travel life. Jumpstarting a car is easy. You’re on land, and it will be easier to ask another car to do the jumpstart with you. What about a boat? It looks more difficult to stall your boat in the middle of the water.
Okey, let’s get into today’s topic!
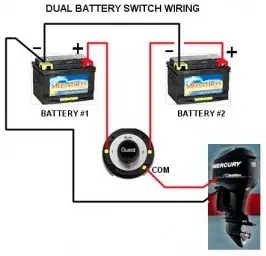
How will you hook up two batteries of a boat? You can quick check the steps below and you can see the diagram below:
Step 1. Choose a switch
Step 2. Battery installation
Step 3. Find a nice spot to place your switch
Step 4. Connect the cables
Step 5. The negative crossover should be attached

Stopping in the middle of the water because of a dead battery does not need another boat to restore it. Unlike in cars where you need another vehicle, in boat battery problems, you only need a spare battery to revive the life of the dead battery or the spare one can be use as your alternative.
More Detail On Wiring Two Batteries
Step 1. Choose a switch. The best switch for hooking up batteries is the one that fits or suits two batteries. The switch should be able to handle a cranking motor. Some switches have the lock protects against theft, and the other one protects against disconnected circuits that may damage the alternator of the boat.
Step 2. Battery installation. Make sure that the batteries met the specifications indicated in the boat motors. If you are using a wet cell, make sure that it is placed in a security box. For AGM batteries, security box is no longer needed. You will need a bracket or a tie down.
Step 3. Find a nice spot to place your switch. Based on the standard of boating, the switch must be placed near the battery. The surface is set at 4-6 inches wide, which is the usual standard size for a switch.
Be sure to install the positive switch to the cables first. You may also have the option of mounting the switch above, be assured that sprays won’t reach it.
Step 4. Connect the cables. Make sure that the cables you use are marine cables and with the right size. Connect all the negative wires. Connect the disconnected positive signs. The accessory wire should also be connected to to the output port of the switch.
Step 5. The negative crossover should be attached. Crossover cables which will connect the batteries negative terminals are highly needed for the proper operation of a dual-battery.
All you have to do is to attach the negative wire and the negative cable lug from the negative post of the battery to the motor. Check all terminal nuts. They should all be tightly secured.
Congratulations! You have performed the hooked up so well. Just in case you are not confident with your work, you are always free to ask a mechanic to be sure.
Here are the tools and materials you will be needing in hooking up two batteries:
● At least two(2) Marine batteries that followed the boat’s specifications.
● Selector switch or power cell
● Battery box that comes with a tie or bracket
● 2/0 marine box cable (red and black)
● 2/0 lugs, either soldered or crimped
● Heat Shrink piping and tubing
● Positive terminal caps
● Power drill and bits
● Mountain screws
● Socket wrench
● Crimp (heavy duty is preferred)
● Soldering gun
● Wire stripper
● Cable clamps and tie wraps
● Safety gloves and goggles
Those are the tools and materials you will need when you hooked up two batteries. Before we proceed to the step by step procedures, it is also important to note some safety precautions that you need to observe since you will be working with batteries. These are highly hazardous and combustible materials that may explode anytime.
Safety Precautions
1. First of all, you have to make sure that the battery terminals are detached from the cables. Remember that batteries stored potentially dangerous chemicals. Disconnecting the wires from the terminals saved you from high-risk short circuits or electrocution.
2. Used only the prescribed size of wires and be sure to follow the safety precautions in the manual for secure protection.
3. Check the metal to metal connections. Be sure that it is clean. Terminals should be of the proper size and waterproof. Metal fasteners should be well-secured to ensure low resistance links.
4. For outboard motor application, you should use Hex nuts or nylock nuts instead of wingnuts. The lock washers should also be tightened well. For inboard applications, you should use Clamp-on battery terminals attached to the cable of the battery.
5. Goggles and gloves are a must when you work with arrays. Make sure you have a water hose nearby in case you want to wash your face when acid splashes on it.
6. Never work near an open flame and be careful in using uninsulated tools. Uninsulated tools may create a short circuit that could ground you.
Now that you are fully ready for the process, read on and remember each step, so you will know what to do when your boat battery stopped working while you’re in the middle of your water trip.
Tools You Need To Install Batteries
As I have been talking a lot about batteries, I think it is equally important to note the right tools needed to change and install batteries. These tools should always be accessible in your vehicles.
● You will need a 10mm 3/8 Drive Socket.
● A 3/8 inch Drive Socket Extension will be useful.
● A 3/8 inch?Drive Quick Release Ratchet is a must.
● You will also need a Battery Terminal Cleaning Brush
● A battery Dielectric Grease works against corrosion.
How Do You Use These Tools?
The tools are essential in installing a battery from any vehicle. Having these with you when you travel saves you a lot of trouble. Here is how you use them.
Battery Terminal Brush
You will need this when you clean battery corrosion found on its terminal. Just insert the brush and clean both the positive and negative terminals of your battery. You may use this to clean the battery posts as well.
10mm Combination Wrench or Socket
Before you can do anything with the battery, you have to remove it first. You can only do this with the use of a 10mm combination wrench or socket. Loosen the 10mm bolt to remove the battery clamps.
Dielectric Grease
Use this dielectric grease to prevent the battery against corrosion and protect the terminal of the cells. Dielectric grease may also improve your batteries’ connection.
How Can You Add A Second Battery To Your Boat?
Adding a second battery to your boat is a great move. It will amplify the power of your ship, instead of having just one, you will have the power of two batteries for your boat.
Consider the following factors when you add a second one to your boat. You should consider this to ensure that the one you choose will function well and will not be wasted.
Space
Physical space should be present. You cannot add a second one if there is no place or room for it. You may customize an additional battery compartment for your second battery. The most important thing here is that your second battery must be safe and secured like the first one.
Wiring Up
Batteries should be matched. To avoid uneven distribution of power, get a second battery that is equally matched with the first one.
Circuit paths should be of the same length. The positive lead should be connected to the old battery while the negative point should be on the second one.
Always keep the plastic terminal covers intact until it is such time to connect to the terminals.
Can Your Run Two Batteries On Alternator?
Yes, it is possible to run two batteries in a single alternator. However, you need to practice a lot of caution in doing that, especially if only one cell is charging and the other one does not charge.
As there will be no limit in the current charging, the danger of exceeding the charge against the one prescribed by the manufacturers becomes highly risky. You can also burn out the wires if they are not capable of carrying the load.
Using a single alternator for two batteries is high-risk. If you intend to do this, you have to be sure that you know exactly what you are doing. If things are not sure, it will be better to ask an expert. Safety and precautions first.
How To Wire A Dual Battery Switch
Wiring a dual battery switch is one of the easiest things to do. Dual switch for your two batteries will give you the time to use both batteries at an alternating time. This will exercise your batteries and will not get stalled.
1. When wiring the two batteries, you must do the grounding for both batteries in an engine’s common ground.
2. Run a single ground wire to one battery and the other wire must be tap to the other battery.
3. Ensure that the ground wire to the engine block could handle the current coming from both batteries. So it will be better to use a second cable to the new battery.
4. The cells must fit the insulated terminal post cover.
Using two batteries in a boat increases power and having an emergency supply in case of emergency. The procedure is easy on How to hook up two batteries in a boat diagram. Always observe caution and safety when doing battery related works.


