Now and then, you may be required to top up your battery using a charger. A charger helps keep the battery full and thus boosting the life of the battery. When it comes to charging your battery, it’s advisable to keep track of the progress to prevent the cases of overcharging.
That’s where the battery charger amp meter comes in the picture to give you a precise reading. Unfortunately, many people don’t know how to read a battery charger amp meter. Without saying much, I will start by telling you what an amp meter is and then continue to explain how it’s used.
Definition of an Amp Meter
When it comes to picking the actual battery readings, many people find it confusing to differentiate between an ammeter and a voltmeter. Well, the two may seem similar but are two different things. For instance, an amp meter in this scenario is the device you use to measure the amount of current flowing from the charger and into the battery.
The name is usually derived from ampere, which is the SI unit for electric current. A voltmeter on the other end is used to measure the voltage, or in other words, the potential difference. Often, we use water passing through a tunnel as an example to help people understand the difference between voltage and current.
In such an instance, the electric current is compared to the rate of flow of the water while the voltage is compared to the pressure of the water from the tunnel. The same way that water pressure increase with the rate of flow is the same way that the voltage increases with current.
Two-Step Guide on How to Connect Your Battery to a Charger
By now, you understand what is an amp meter is and what it does. The fact that it measures the amount of current flowing through your charger means that you will need first to connect the charger to the battery.
Connecting the battery to a power source is a straightforward process. You only need some goggles and pair of gloves and you’re set to begin. Here is a guide on how to carry out the operation.
1. Remove the battery clamps. The first and most crucial step is to remove the battery clamps from the terminals. Remember, you’re charging the battery here and not the car.
Therefore, you should begin by unscrewing the nuts tightening the clamps on the terminals. You can use some pliers if you find them tight. Once the nuts are loose, disconnect the cables beginning with the one on the negative terminal. The procedure helps eliminate the chances of shorting your battery, which can reduce its lifespan.
2. Insert the charger. Once the battery clamps are unfastened, you can then go ahead and connect the charger to the battery terminals. However, it’s advisable first to measure the electrolyte levels.
If you find the levels to be low, then it’s advisable to top up before starting the charging process. Once you’re sure that the levels are in check, connect the charger. Connect the red cable of your charger to the positive terminal of the battery and black one on the negative side of the cell.
How to Pick the Actual Meter Readings
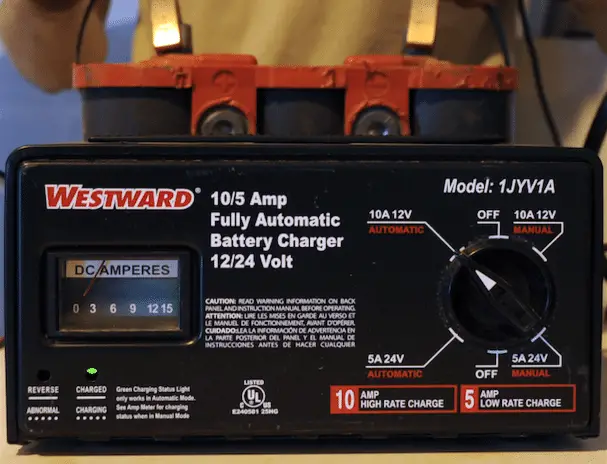
Once the charger is connected and turned on, it’s time to pick the readings. After switching on the charger, you will notice the meter needle move to the set amps. However, with time, the needle moves down an indication that the battery is charging.
What happens to the needle when the battery is full, you may ask? When the cell is filled, the needle on the meter drops to almost half the set amps.
What to Use When There Are Two Needles on the Meter
Often, it can be confusing for the newbies, especially when the amp meter has two needles. When two needles are involved, you must understand that one measures the amount of charge in the battery, while the other one measures the amount of current coming from the charger.
The pointer that moves to the set figure once the charger is put on is the one that measures the amount of current going into the battery. With this type of amp meter, the two needles get on top of each other when the battery is charged to full capacity.
What if I am Using a Charger with a Digital Amp Meter?
When shopping for battery chargers, you will realize that the market is flooded with plenty of options. Today, you can as well find chargers with digital ammeters. Chargers with such kinds of meters are always recommended, especially for the newbies. Such meters display their readings in digital format, hence making it easy to keep track of the charging.
We both know that meters with needles can be a bit confusing when it comes to noting down the actual reading. Most of the battery chargers with a digital meter do work as a voltmeter, as well. The dual functionality can get many people confused when taking the measurements. Therefore, you must be sure that you’re recording the current readings and not the voltage.
With such amazing features, such chargers are usually priced high. But, they are worth every penny as they help a lot when it comes to minimizing the cases of overcharging.
How Can I Choose the Right Charger for My Battery?
Apart from considering the type of amp meters, there are many ways in which you can choose the right charger for your battery. First, you need to consider the type of cell you intend to use with the charger.
For instance, gel batteries can’t be charged using typical chargers. They require a special kind of charger that can perform the charging without interfering with the battery’s electrolyte. Also, it’s advisable to consider the amp-hours the battery stores before shopping for a charger.
The rating is what determines the amount of time the charger is likely to fill the battery. Say, for instance, for an empty battery rated 50 amps hours, it would take a10-amp charger, about six hours to fill it.
Lastly, you can consider the price tag when shopping for a charger. It’s advisable to look for a charger that matches your wallet. However, you should evaluate your options to ensure that you pick a charger with a price that matches its features.
Sources:
1. How To Read A Battery Charger Amp Meter? – Power Of Auto World!
2. How to Read a Battery Charger Gauge – It Still Runs


